The fifth step of proper brazing procedure is where the action happens: this is how to actually braze a joint. Brazing involves heating the assembly to brazing temperature, and flowing the filler metal through the joint. First, the heating process. As we've seen in brazing, you apply heat broadly to the base metals. If you're brazing a small assembly, you may heat the entire assembly to the flow point of the brazing filler metal. If you're brazing a large assembly, you heat a broad area around the joint. The heating method most commonly used in brazing a single assembly is the hand held torch.
A variety of fuels are available like natural gas, acetylene, propane, propylene, etc. that are combusted with either oxygen or air. The most popular is still the oxy/acetylene mixture. All you have to keep in mind is that both metals in the assembly should be heated as uniformly as possible so they reach brazing temperature at the same time.
Avoiding Uneven Heating When Brazing
When joining a heavy section to a thin section, the "splash-off" of the flame may be sufficient to heat the thin part. Keep the torch moving at all times and do not heat the braze area directly. When joining heavy sections, the flux may become transparent - which is at 1100°F (593°C) - before the full assembly is hot enough to receive the filler metal. Some metals are good conductors - and consequently carry off heat faster into cooler areas. Others are poor conductors and tend to retain heat and overheat readily. The good conductors will need more heat than the poor conductors, simply because they dissipate the heat more rapidly.
In all cases, your best insurance against uneven heating is to keep a watchful eye on the flux. If the flux changes in appearance uniformly, the parts are being heated evenly, regardless of the difference in their mass or conductivity.
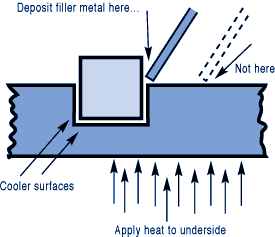
Depositing The Filler Metal
You've heated the assembly to brazing temperature, now you are ready to deposit the filler metal. In manual brazing, all this involves is carefully holding the rod or wire against the joint area. The heated assembly will melt off a portion of the filler metal, which will instantly be drawn by capillary action throughout the entire joint area.
You may want to add some flux to the end of the filler metal rod - about 2" to 3" (51 mm to 76 mm) - to improve the flow. This can be accomplished by either brushing on or dipping the rod in flux. On larger parts requiring longer heating time, or where the flux has become saturated with much oxide, the addition of fresh flux on the filler metal will improve the flow and penetration of the filler metal into the joint area.
However, there is one small precaution to observe. Molten brazing filler metal tends to flow toward areas of higher temperature. In the heated assembly, the outer base metal surfaces may be slightly hotter than the interior joint surfaces. So take care to deposit the filler metal immediately adjacent to the joint. If you deposit it away from the joint, it tends to plate over the hot surfaces rather than flow into the joint.
In addition, it's best to heat the side of the assembly opposite the point where you're going to feed the filler metal. In the example above, you heat the underside of the larger plate, so that the heat draws the filler metal down fully into the joint. Always remember that the filler metal tends to flow toward the source of heat and if you're using preforms - slugs, washers, shims or special shapes of filler metal - pre-place them at the joint area before you heat the assembly.
